Wednesday, August 8, 2012

Show Off Your Stuff Party # 139

Hello and welcome to our Show Off Your Stuff Party!  

The week we are showing off: 


Bright Teacher gift 1

And now it is YOUR turn!! 

Here is the run down:
1. Pay attention! There are 4 categories to link up:
Crafts and Sewing
DIY and Home Decor
Recipes
Inspirational/Creative Writing
pick one and go with it!

{If you pick the wrong one... you can delete your own and add it to the right one! :) }

2. Add a link to your specific post, not the main page of your blog.

3. Please do not link up to something that you are just trying to sell.


4. Link to this party from your post so everyone can get in on the fun. You can just grab my button!


 &

Tuesday, August 7, 2012

Summer Fresh Tomato Basil Alfredo Recipe

I don't know about you, but here in Northern Indiana, the tomato crop is coming in, and mine is glorious! I love tomatoes. I can't say enough how much I love them. I love to see that burst of orangy red within the green bush when I'm harvesting. I also LOVE, LOVE, LOVE fresh basil.


This recipe is VERY simple, and it's a go-to for me on busy evenings, or nights I just don't feel like cooking. It's best in summer when the tomatoes and basil are fresh and at their peak of flavor.


Ingredients:
1 box pasta of your choice
1/2 pound sage sausage (or chicken or shrimp would also be yummy, or no meat at all if you want a vegetarian option)
about 20 cherry tomatoes, or the equivalent amount of any other tomatoes
a handful of fresh basil, chopped (to taste - I used about 6-7 large leaves)
alfredo sauce (canned or homemade, your choice - I use my Betty Crocker recipe for sauce)

Directions:
1. Cook meat
2. Cook pasta according to package directions, then drain
3. Mix pasta, meat, tomatoes, basil, and sauce together in pan
4. Simmer for a few minutes to warm the tomatoes

{I actually added some swiss chard to mine as well, and nobody noticed - the color blended in with the basil, and the taste was unnoticeable - a good way to sneak in some extra power veggies!}
That's it! SO easy, and so FRESH!

Monday, August 6, 2012

You Make My Future Bright! Teacher Gift {Tutorial!}

This is a Sponsored post written by me on behalf of Astrobrights Papers by Neenah Paper for SocialSpark. All opinions are 100% mine.


Back-to-school is here... can you believe it?!  I bet most of you moms are ready for school, but if you are a teacher you want to relish in the last days of summer!   
I have a fun and easy back to school  teacher gift brought to you by AstroBrights papers:
Bright Teacher gift 1
AstroBrights Paper is SUPER bright paper that is very high quality!  The colors are vibrant and would be great for any school project that you want to get noticed (in a good way!) 

Here is what you will need:
AstroBrights papers, Pencils, pens, Mod Podge, Tin buckets (from Target $1 spot)
Bright Teacher gift 2
1. To create the pens:
You cut a piece of paper that is 5"X1.5"
Cover the strip of paper with Mod Podge
Roll the paper on to the pen.
Cover again with Mod Podge and let dry.Bright Teacher gift 3
Optional- add some cute washi tape for decoration! Bright Teacher gift 4
You can create the pencils the same way, but use a 6.5"X 2" piece of paper.Bright Teacher gift 5
2. To cover the bucket:
"trace" your bucket by rolling it on your paper.Bright Teacher gift 6
Here is the shape I came up with.  I only covered the front of my bucket.  Bright Teacher gift 7
I cut out a background using my silhouette cutting machine to make a cool textureBright Teacher gift 8
I used my front paper as a template on the background shape to cut it the right size.
Then use Mod Podge to attach the front paper
cover the front paper with more Mod Podge and add your texture on top
Cover with more Mod Podge and push out any wrinkles or bubbles.  Let DryBright Teacher gift 9
I also cut out the teacher's name (using my silhouette).  I used Mod Podge to attach it to the front.Bright Teacher gift 10
3. How to make the "You Make My Future Bright" flowers:
Cut out a strip of paper that is 11"X 1.5" and a circle that is 2".  (I used my Silhouette's print and cut option for my circles)
Accordion fold your strip of paper all the way across the strip.
Glue together the ends to make it a ring
Push the middle down to create the flower.
Use a blob of hot glue in the middle of the flower to get it to stay.Bright Teacher gift 11
Glue on your circle to the front of the flower.Bright Teacher gift 12
Use hot glue to attach it to your pencils and/or pensBright Teacher gift 13
Add to your bucket to make a super cute teacher gift!! Bright Teacher gift 14
Bright Teacher gift 15
What will YOU create with AstroBright Papers?  Be sure to enter  The GIVE a BRIGHTER YEAR sweepstakes!  You could win $30,000 worth of supples for the school of your choice!  Just hop on over to the AstroBrights papers facebook page and "like" it for your chance to enter!
Astrobrights 2
You can also enter their "Make Something AstroBright" Design challenge.  Submit your AstroBright ideas for your chance to win!   
Astrobrights 1


Visit Sponsor's Site

Linking to:
Today's Creative Blog

Grandma and Grandpa Camp

We have been busy the past few weeks... which explains the scarce posting... we had VBS the first week (which I was in charge of Preschool crafts and snacks) and then we had some family in town.

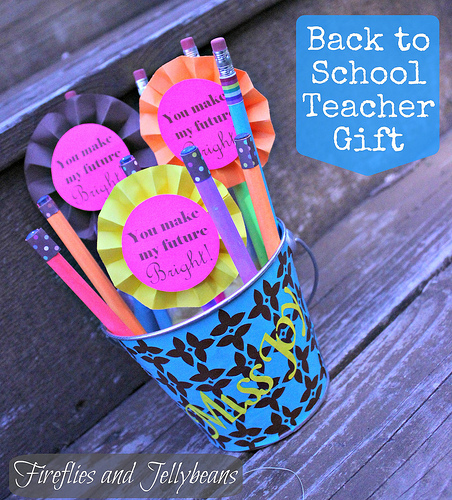
Today I am going to share with you something that my parents did for all the grandkids... it is for you to show your parents to do for you kids! :)  

It is rare that all 7 cousins are together.  My sister lives in South Carolina and we live in MN.  So when they come in town we try to cram as many memories as we can.  My parents came up with Mima and Pepaw (Pronouced Mee-Ma and Pee-pa) Camp.  {Mima and Pepaw is what my kids call their grandma and grandpa}  It is a whole day of fun activities for the cousins to do all together.  
This years theme was Knights and Princesses.  With girls and boys ages 2 - 8 it was a great fit!   My mom and dad put a lot of work into it!  Here is a glance of what when on:

Mima and Pepaw dressed up like royalty to start off the day.  The whole yard also had decorations all around to set the mood.  They decreed that the kids were all in Knight and Princess training.   They also explained that they were all children of The King (God). 

Then they "built" thier castle by plugging in the bounce house!  
The castle themed bouncey house is a hit! 
After the bouncing was done we moved on to the treasure hunt.  There were clues around the yard that lead us to the treasure.  Mima and Pepaw explained that although treasure is very valuable, God's love is the most valuable gift we have. 
Then the girls and boys broke off to some more training by reading some stories about Knights and Princesses
Then came the time to get dressed like Knights and Princesses.  Even the Helpers {my sister and I got in on it! That is my beautiful sister!}  The girls got dolled up a beautiful princesses and the boys got outfitted as brave knights.  Each with their name on their costume. 
{My daughter did NOT want to wear her hat!}

Next we feasted like the Kings kids! 

After lunch came more training....
The girls learn how to ride a house both side saddle and astride. 

While the boys learned to joust.

Can you ever have to many castles?   One to decorate and one to take a brake in! 

There was more that I did not get pictures of.  They talked about putting on the Armor of God from Ephesians 6:10-18.  There were relay races and sprinkler running.  
Fun was had by all....

... and after it was all done they also just had fun swinging! 

It was so great spending time together and we will miss them now that they are home.  But it will be nice to get back to a somewhat normal schedule again!

Wednesday, August 1, 2012

Show Off Your Stuff Party # 138

Hello and welcome to our Show Off Your Stuff Party!  

 This week we are showing off:


And now it is YOUR turn!! 

Here is the run down:
1. Pay attention! There are 4 categories to link up:
Crafts and Sewing
DIY and Home Decor
Recipes
Inspirational/Creative Writing
pick one and go with it!

{If you pick the wrong one... you can delete your own and add it to the right one! :) }

2. Add a link to your specific post, not the main page of your blog.

3. Please do not link up to something that you are just trying to sell.


4. Link to this party from your post so everyone can get in on the fun. You can just grab my button!


  &

Content Ad