Friday, July 13, 2012

Mod Podge Rocks Book Review AND Giveaway!

I am sure by now you have heard of the WONDERFUL Amy Anderson of the Mod Podge Rocks blog. She is awesome and showcases amazing ideas using Mod Podge! 

Well, she has written a book called: Mod Podge Rocks!  And it has over 40 Mod Podging crafty projects for you with step-by-step instructions!   She also includes tips and tricks to using Mod Podge to get the best results!  

I don't want to giveaway the whole book but I do want to show off a couple of my favorite projects to get you guys excited about it! 

First off, I love these Fall Painted Acorns... so cute....


 I am now searching for a hard cover suit case to Mod Podge.
I think I swooned just a little bit when I saw this!  I especially love the fawn... ya know, because of Fawn-da!  I bet she was thinking of me when she made it. ; )

Now here is where you get excited because I am giving away one of her books to one lucky reader... AND it is coming with some awesome Mod Podgey goodness too!  
Here is what you can win:

How to enter:
We will be using Rifflecopter for this giveaway.  Log in either with your email or Facebook.
You must leave a comments answering this question:
  What Mod Podge Projects do you want to work on next? 
That's it!  Only 1 entry person.  US Residents only.   Giveaway closes next Friday (7/20) at midnight.

***Disclosure: I was supplied with the Mod Podge Rocks book for free but all my opinions are 100% honest***


Wednesday, July 11, 2012

Show Off Your Stuff Party # 135

Hello and Welcome to the Show Off Your Stuff Party! 

This week we are showing off: 

And now it is YOUR turn!! 


Here is the run down:
1. Pay attention! There are 4 categories to link up:
Crafts and Sewing
DIY and Home Decor
Recipes
Inspirational/Creative Writing
pick one and go with it!

{If you pick the wrong one... you can delete your own and add it to the right one! :) }

2. Add a link to your specific post, not the main page of your blog.

3. Please do not link up to something that you are just trying to sell.


4. Link to this party from your post so everyone can get in on the fun. You can just grab my button!


  &

Tuesday, July 10, 2012

Homemade Bread-Machine-Bread

I LOVE homemade bread! But it takes a LOT of time if you're doing the kneading yourself. I feel like it takes all day. Mix, knead, knead, knead, rise, smoosh, roll, rise again, bake... I used to try to make 4 or 8 loaves at a time, then freeze the dough. That worked ok, but when the frozen loaves ran out it would be a while before I had time to make a whole bunch of dough again, then I'd end up buying bread anyway.

That's why I started using the bread machine for fresh bread. However, I don't care for the high density and weird shape that the machine gives the bread.

So I compromise:
I use the bread machine for kneading only because it cuts down on a LOT of the work.  The machine does the kneading for me so I can go about doing other things around the house. I put it on the dough cycle, then I shape the loaf and bake it in the oven so it looks, feels, and tastes how I think fresh bread is supposed to. Since I started using this method I haven't had to buy very much bread at all. I make a loaf about every other day; more on the weekends (or in summer) because everybody is home from school and work and we go through it a lot faster. We are all turning into bread snobs. Also, I have recently discovered that bread can be baked in a slow cooker, which is really amazing on these sweltering summer days! I'll explain at the end.

This recipe is slightly modified from the whole wheat recipe that came with my machine:

Place in pan in the order listed:

1 egg, with enough warm water added to equal 1 cup
3 T olive oil
2 T honey
1/2 T salt
1c. bread flour (this is very important, it helps the dough rise)
2 c. white whole wheat flour
{at this point spread the flour around so it's flat-ish and covers all the liquid. Tap the pan on the counter a few times}
slightly heaping 1/2 T yeast (I use quick-rise yeast)

Put machine on "dough" cycle.
When cycle is done, take dough out of pan and flatten into rectangle (about 8" x 12") with hands or rolling pin onto lightly floured surface (I use the wheat flour here because then the bread doesn't stick to the pan as much after being baked}
Starting at a short end of the rectangle, roll tightly into loaf shape, squishing the ends with each turn to keep air out.
Fold both ends slightly under the loaf and place into greased loaf pan.
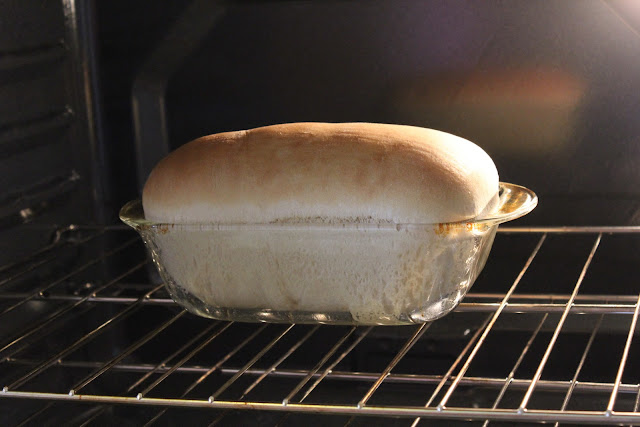
Cover with towel or cloth {I use a cloth napkin} and let rise until the top of the loaf is about 2-3 inches above the top of the pan.
Bake in oven at 350 for 25 minutes {ovens may vary}.
If you want to try baking it in your slow cooker, just shape dough into loaf, and place in lightly greased crock. Cook on high for about an hour and a half (you'll want to watch it the last 20 minutes or so to make sure the bottom doesn't burn). To make the top of the loaf brown and crusty, place under broiler for about 5-10 minutes.

A couple of notes about my bread making:

*Depending on the room temperature and humidity, rising time can vary. If it's been several hours and seems to be done rising, but still isn't high enough, bake as-is. It won't be as fluffy, but it's still pretty good. There are a lot of factors that affect rising. I find that if the dough is too dry or too wet it doesn't rise well. I don't always have the perfect rise, but I always have delicious bread!

*If humidity is high (in summer), use a little less water or a little more flour
*If humidity is low (in winter), use a little less flour or a little more water
*When I say "a little" I mean a LITTLE - tiny little. Like a teaspoon.

*Regular whole wheat flour is slightly cheaper, but the white tastes SO DELISH - my opinion, you could definitely use whichever you prefer.

*When I was shopping for a bread machine I could not find a single one in a store. There are a lot online, but I ended up getting TWO given to me by friends who never used theirs, which I think is the case with a lot of people, so ask around and find out if any your friends have wedding-gift-bread-machines sitting in a box in the attic. ;)


&

Monday, July 9, 2012

I am official with UPrinting!

I wrote this post as part of a paid campaign with Uprinting and Blueprint Social. The opinions in this post are my own.

It's official... I am a blogger!  :)   Ok - I have been a blogger for over 3 years now... but I finally have business cards to prove it! I was so excited to get my Uprinting Business cards!  Is anyone else met with blank stares when you tell people that you are a blogger?  I am... followed by the "What a dork" look.  I am not sure if the business cards will help with my dorky-ness (not sure if anything can help that!) but I can at least get my blog out for people to see with my new cute business cards!
 UPrinting is so easy to use and they have some fun shapes for business cards that you choose from too!  I choose the leaf shape.  I wanted something whimsical!   You can load your own backgrounds and pictures into their site to use too!  I created the backgrounds for the back and front of these with PicMonkey. {You can make your own QR code here}

Once you've got your card how you want it, Uprinting has a feature that lets you see it 360 Degrees just to double check.  You can also get a proof if you want... but I didn't.  I wanted my cards ASAP! : )   The colors are bright and the quality is professional. I love them!  

Keep in touch with Uprinting
FaceBook....Twitter...Pinterest

Saturday, July 7, 2012

Strawberry Picking with the kids!

We love strawberries at our house... like, we would eat them for all of our meals and all our snack and become great big strawberries if we could.  So, I thought it would be fun to go and pick our own.  Plus fresh strawberries are WAY better then the ones at the store!  My youngest is just starting to get to the age where she can do more things independently, so that means more outing for us!!  Yay! 
We went to our local Orchard/Farm... they have apples and pumpkins in the fall and strawberries in the summer.  It was a warm and sunny day so we went early.  It was a good thing too, because it was the last day of picking so we just squeaked in!  Phew!  

It started out like this... both kids were very into picking the RED ones!


But it turned to this after only a couple of minutes....
I am pretty sure they lost money on us since most of our strawberries were eaten before we made it to get weighed.  

My son just wanted to play with the flag they gave us to mark our spot.

"Ok, honey- can you just pretend that you are picking strawberries for me to get a picture??" 
"Yeah- sure mom."

I ended up picking most of the berries while trying to keep the kids from bugging other people.  But at the end of the day both kids said it was their favorite thing of the day!  AND we got some YUMMY strawberries to boot!   I see this becoming a summer tradition! 

What have you been doing with your kids lately?

Content Ad