Showing posts with label gift idea. Show all posts

Wednesday, September 12, 2012

Knight Hoodie Tutorial (Free Downloadable Patterns)


My Nephews' birthdays are at the end of summer.  There mom (my SIL) asked me to create some dress-up clothes for them that will not fall apart and she also said that they like pirate and knights.  I was up for the challenge.

And then I saw this:
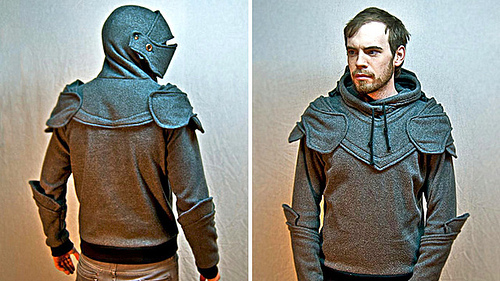
Armor hoodie
Armor Hoodie

Totally cool- right?!  Now the guy who made this, created the whole thing.  I was inspired but I also wanted a short cut so I thought I could start with a gray hoodie and add to it to make it look like knight armor.
Knight Hoodie 1 

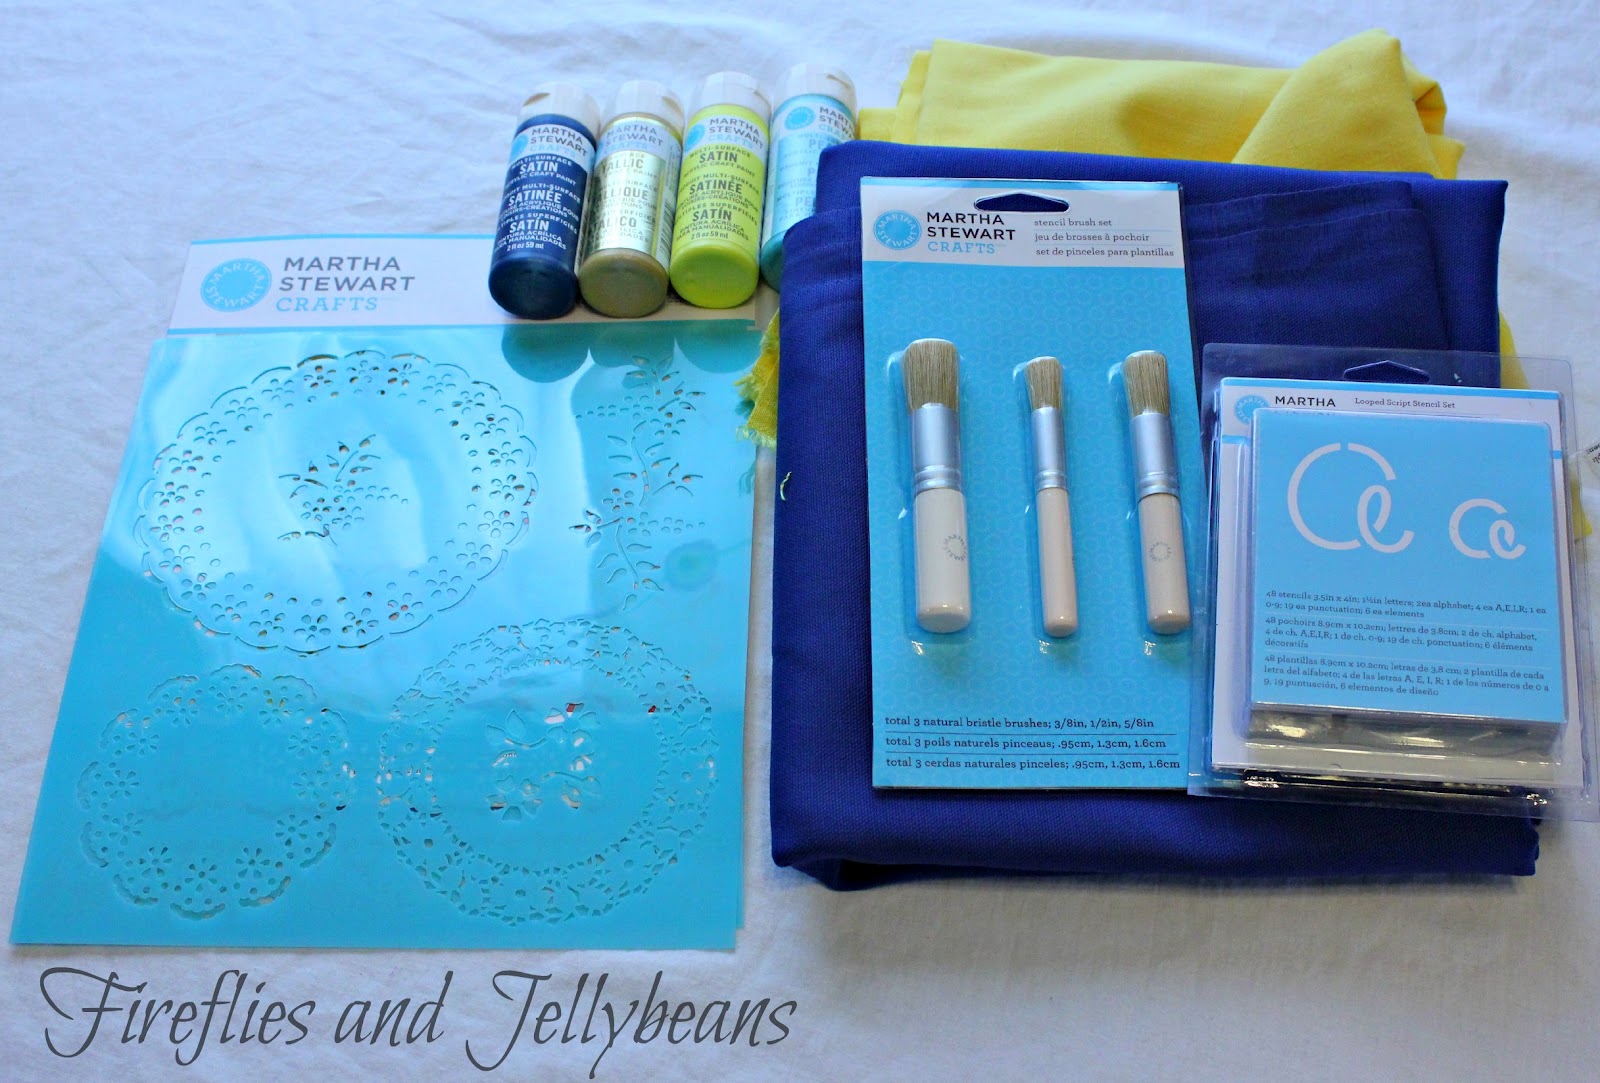
Here is what you will need:
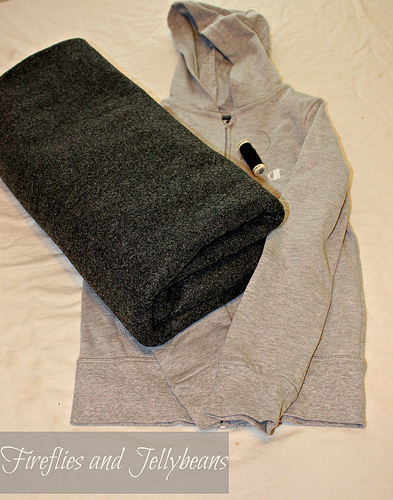
Gray hoodie
Gray felt
Black thread
Mask pattern (Free download)
Helmet visor pattern (Free download)
Shoulder armor pattern (Free download)
Knight Hoodie 2 

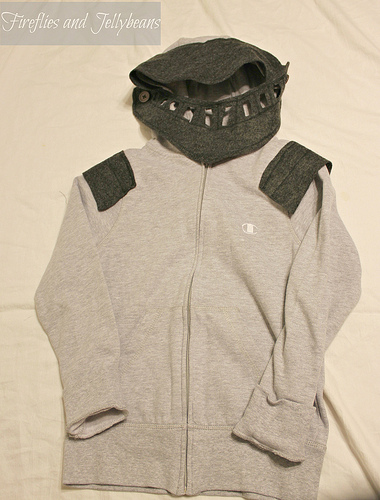
1. Cut out the  mask pattern and trace the outline of the it onto your felt on the fold. Cut out the pattern out of the felt.
Knight Hoodie 3 

2. Use your pattern to trace the holes onto one side of the mask.  Flip the pattern over to the other side and trace the holes.  Cut out the holes (I used a sharp scissors).  Sew zig-zag details on to the mask to give it dimension.   (not pictured- use your button hole attachment on your sewing machine to add a button hole to each side of the mask)
Knight Hoodie 4 

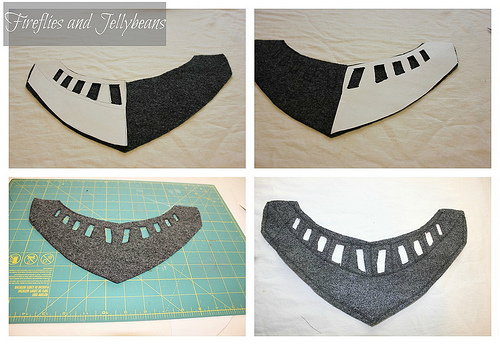
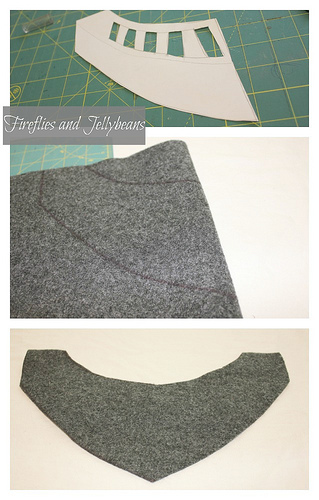
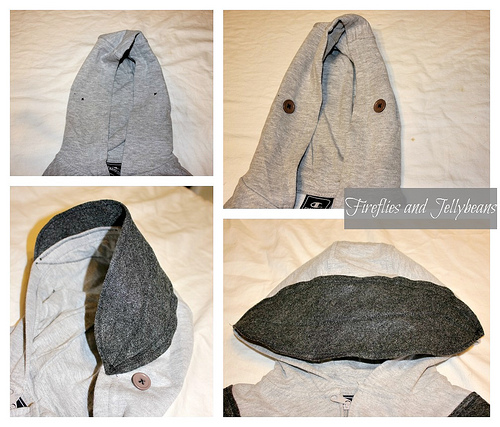
3. Mark of each side of the hood were you want your button to go to attach the mask.  Sew on the buttons.  Cut out the helmet rim pattern.  Trace the pattern on the fold of the felt and cut it out.  Add zig-zag stitching around the outside edge to give it dimension.  Attach it to the top of the hood lining up the ends with the buttons. 
Knight Hoodie 5

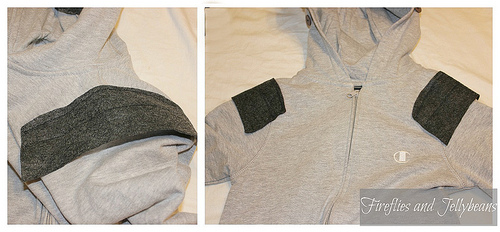
4.  Cut out the shoulder armor pattern and trace it on the fold of your felt.  Line up the middle of the shoulder armor with the seam of the shoulder of the hoodie and pin in place.  Sew on to the shoulder using a zig-zag stitch.  I used 2 lines.  
Knight Hoodie 6
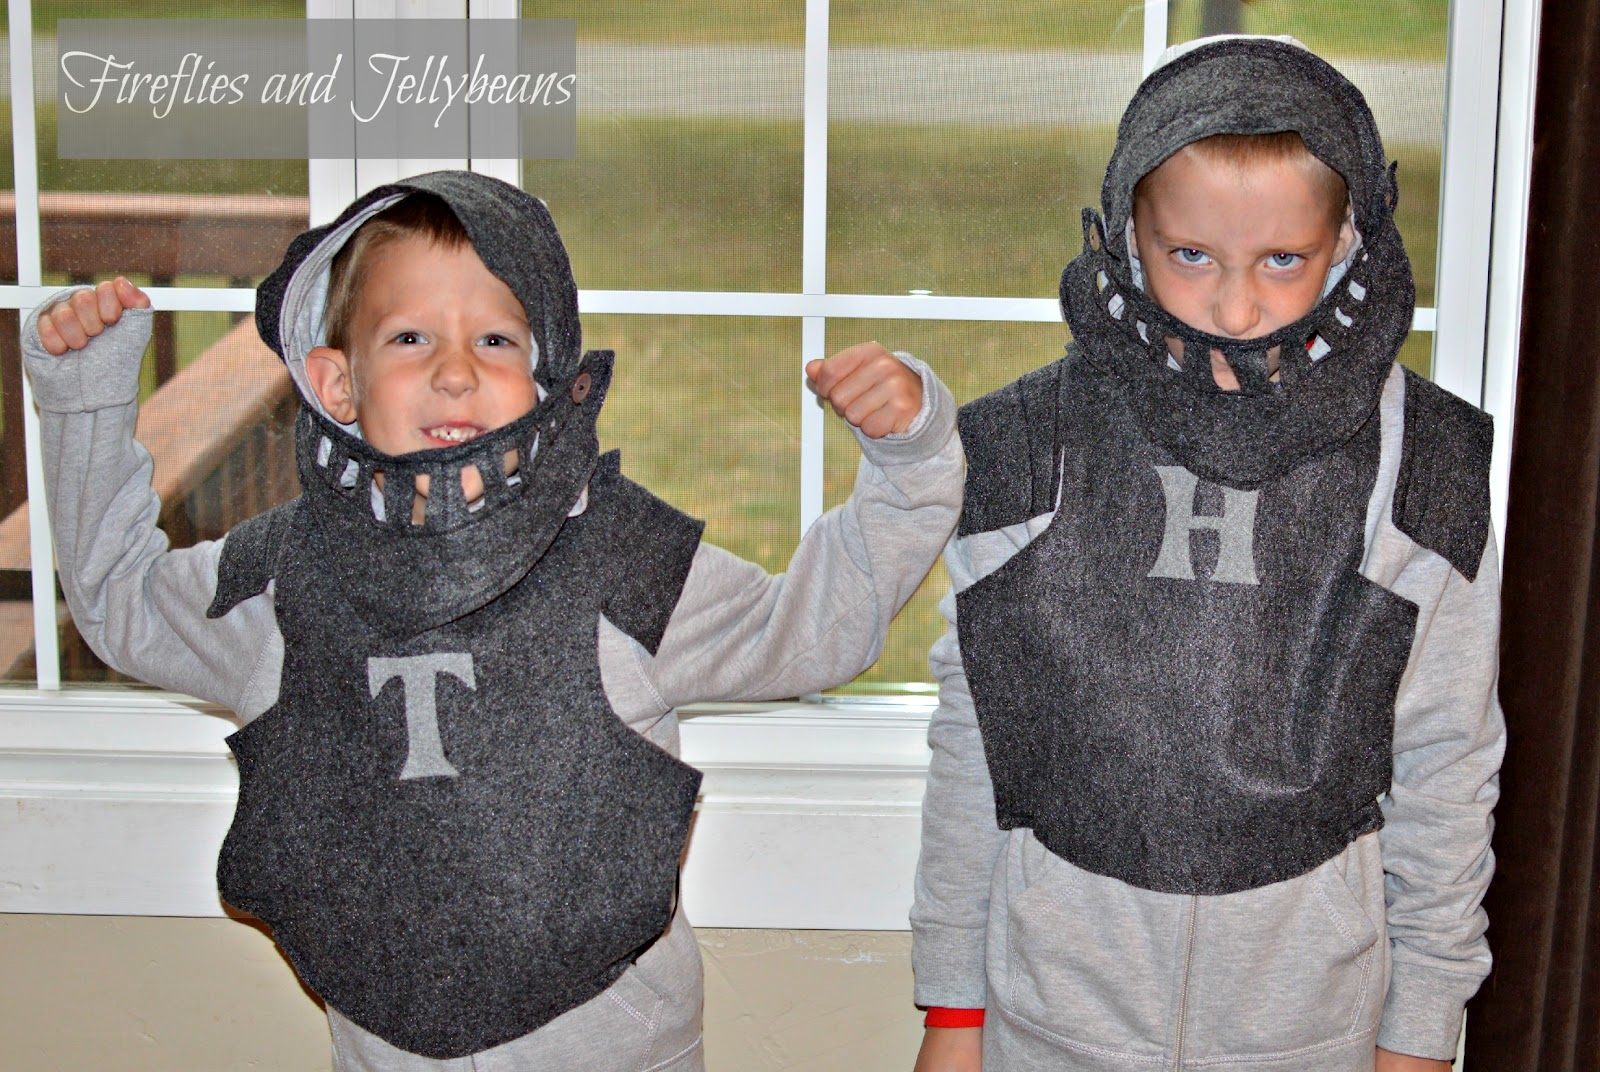
Here are my nephews sporting their new Knight hoodies!  For the breast plats I just cut out a shield shape and sewed elastic straps to the back in a criss-cross.  Then I used a stencil to monogram them. 


Wednesday, May 30, 2012

Easy, Affordable, Last Minute Teacher Gift

My kids' last day of school is only 2 days away! I've had this idea in mind for a while, and luckily, it's SO EASY we whipped them up in one day. We really love plants and gardening around here (all 3 of our girls are named after plants, and we didn't even realize it until after they were all born and named)!

Here is what you need to do:
1. Run to your local garden center, buy a small plant for each teacher you want to thank (could be house plants, herbs, whatever you like). Buy a clay pot that each plant will fit into. I bought 2 small plants and 4 pots, and it cost about $15. If you want to make it even cheaper, you could pull something out of your own garden, which I did for a couple of mine (the small ones in the picture are sage out of my garden).

2. Write the words "Thanks for helping me grow" with marker (or paint) on the clay pots. I admit, I borrowed the phrase from something I saw on Pinterest, but I totally adapted it to make a completely different project!

3. Have your child (if old enough) decorate the pots with markers, paint, stickers, whatever. Be creative.

4. Put the plant inside the pot, and there you go!

My kids are young, so I'm not going to let them carry the plants on the bus, I will bring them in to the school tomorrow. The small pots are for the gym and music teachers. One of my daughters is going to a different school next year, and she really loves her gym and music teachers, so I wanted to do a special good-bye gift for them. Then I got to thinking, I bet those "extra" teachers really get neglected at the end of the year, and it's a good idea, if you can afford it, to do something for them - the people who aren't your child's "main" teacher, but still put a lot work into helping your child learn and grow.

This project literally took me a couple hours (at the most), including driving to the store, potting the plants, and my kids' decorations on them. You might already have the materials and don't even have to buy anything!


&

Saturday, May 26, 2012

ALWAYS last minute!

So- it was 9:30 the night before my son's last day of preschool and it hit me... I don't have teacher gifts!!  I had planned for weeks what I was going to do but always put it off because... well... because that is what I do: leave everything to the last minute! Good thing Walgreens is right down the street and open until 10PM! 
I picked up these cute water bottles and used my Silhouette to cut out the teachers names with outdoor vinyl (I get my vinyl HERE - super cheap!)  That is what I love about my Silhouette the most... making personalized gifts at the very last minute!  Now, I try to keep a stash of vinyl around just for projects like this.   People love to get personalized gifts!

 I cut out Thank You tags with my silhouette too.  In the morning had my son draw a picture of each of his teachers on the back.   I was in bed by 11 with a cute teacher gift all ready!  Phew- good thing I work good under pressure! : )


Tuesday, May 22, 2012

Flip-Flops repurposed into summer home decor! {Tutorial}

So, I hate wearing flip-flops.  They hurt my toes and I cannot stand the feeling of them on my feet.  I know I am totally weird but there it is!  But- I do think that they are adorable.  I got a pair of flip-flops for my birthday, and I decided to repurpose them into a cute summer decor for my 3 season porch.  What could be cuter them to make them flip-flop photos?

Here is what you will need to make your own:
Flip-flops (the cheap ones!)
Lace 
Mod Podge
Spray Adhesive
Photos printed on paper
scrap wood (I used a broken ruler)
Hot Glue (not pictured)
Optional: Paint markers (not pictured)

1. Start by cutting off the band.

2. Trace around your flip-flop on your photos (my photos are 5X7 printed my regular paper in black and white).  Cut out your pictures and attach them to the flip-flop using spray adhesive. Poke a hole through the paper where the top hole was on the sandal.
3. Brush Mod Podge over the pictures to seal them to the flip-flops.  I did 2 light coats. Let dry completely.

4. Cut out 4 pieces of lace about 6 inches long each.
Use a pencil to help  push the lace through the hole in the sandal.
Use hot glue to attach the lace to the backside.

5. Use hot glue to attach your piece of scrap wood to the back of your flip-flops to attach them together. 
6. Optional: Use Paint Marker to add some fun to the bottom of the sandal.

I hung mine up on the wall.
I think these turned out pretty cute and would make a great gift! 
 So tell me, do you love or hate to wear flip-flops?


Linking to:
 
Today's Creative Blog

Wednesday, May 16, 2012

Petite Lemon Personalized Gifts

I love personalized gifts! 
 I love to give them and get them! 
 If I get a gift with my kids name on it, I am in LOVE!  

That is why I am so excited about Petite Lemon!   
A cute new shop specializing in Personalized gifts! 

Here is a little about Petite Lemon:
Petite Lemon is a group of moms and dads who love designing personalized, colorful goods that add style and meaning your special moments and festivities.Our fresh modern collection personalized growth charts, alphabet posters and kids tshirts make the perfect new baby gift, big brother or big sister gift or a charming addition to your nursery or child's space. All of our products are created and personalized by professional designers and printed with the finest quality inks and materials right here in the US. Every order is hand wrapped, ready to gift.

I love that the shop is run by Moms and Dads!  It means they really know what we want for our kids!  And you can tell that the people at Petite Lemon love what they do... The products speak for themselves!  

How cute would these be on your child bedroom wall?!

About our growth charts:
Available in our signature poster paper or durable cotton canvas with grommets — our growth charts are 12 x 42" and are a beautiful, charming addition to your home. A growth chart is a forever keepsake as you can take with you when you move or re-locate it within your home, as opposed to the "old school" method of marking height within a door jam. Kids love to see how much they've grown, and we know because our little ones LOVE to track their height, their little siblings height or even their favorites stuffed animals.

The perfect gift for the big brother or sister!  It always touched my heart when people remember my son when my daughter came home!  

About our tshirts:
We've recently launched a brand new collection of sibling tees — a perfect gift for new big brothers or big sisters or for your new little ones, little brothers or little sisters. All designs are available on super soft 100% cotton onesies, short sleeve or long sleeve, or baseball tee styles. Digitally printed with state of the art equipment, your personalized art is directly printed on each tee so they feel super soft, comfortable, and durable. The quality is unique and fabulous!

They also have stunning posters to use as art work for your nursery or child's room! 

There is nothing sweeter then seeing your baby's face! 

About Personalized Photo Posters:
Our photo posters are available in our heavyweight, signature poster paper or gallery wrapped canvas — printed with bright, vivid eco friendly inks. Our exclusive photo keepsakes are a stylish, beautiful way to showcase special photos of your family and children

A perfect baby shower gift! 

About Personalized Alphabet Posters:
Any Petite Lemon alphabet poster is available for print in our signature poster paper, removable poster sticker or as a gallery wrapped canvas. Each Petite Lemon Alphabet poster is created and personalized by a professional designer and is printed with vivid eco friendly inks.

F&J readers get to take 15% off Sibling T-shirts and Decor
 with the code: FIREFLIES15!
Be sure to like Petite Lemon on Facebook to stay up to date on new items and deals!

Wednesday, May 2, 2012

Stenciled Pillows for a Mother's day gift with Martha!

Mother's day is coming FAST!  My mom moved last summer, and it was pretty stressful for her.  In her new house she has a 3 season porch, so I decided to make some pillows for the porch where she can relax!  Her colors are blue and yellow.

Here is what I used:
Martha Stewart Craft Supplies:
Stencils (Letter and Doily)
Paint
Stencil Brushes
Spray adhesive (pictured below)
Other supplies:
Canvas fabric
Sewing machine and other sewing tools(not pictured)
Painter's tape(Pictured below)


Detailed instructions for making pillow covers can be found HERE @ Shabby Beach Nest... I will just give an overview of what I did.  I am focusing on the stenciling part and not the sewing part. 

1. I cut out my pieces for the pillow covers. 

2. I used spray adhesive on the back of the stencil to help keep it in place. 

3. I used the stencil brush to pounce the paint on the stencil.  You want to have it be an up-and-down motion.  Also you don't want a ton of paint on the brush.  I used tape to block off other parts of the stencil so I wouldn't accidentally  paint over those.  

4. I did one layer, let it dry and then did the next layer, and so on.   Once all the paint had dried, I heat set it with an iron.

5. I pinned and sewed my cover together. 

I put my pillows inside. 
I love that you can make whatever design you want with colors to match your own decor!
The Martha Stewart paint is wonderful!   It showed up great on the dark color in one coat.   I also liked working with the stencils.   

For the yellow pillow I added letters.  To help keep them straight, I used tape to make a line.  I also used the tape to help keep the boarder straight too. 


 I hope that my mom likes them!


*** Disclosure: I was supplied with Martha Stewart Craft Supplies to make this project.  All my opinions are 100% honest!***


Tuesday, April 24, 2012

Simple Party Dress Tutorial

We celebrated my sweet daughter's 2nd birthday this weekend!  Time is going too fast for me!  We decided to have the party at an indoor play park the Eagles Nest.  So, I needed a simple, cute party dress that could also be a play dress.  And it is easy to make too!

Here is what you need:
Fabric*** (for my size 2T dress I used > 1/2 yard)
T-shirt
Iron-on Vinyl Decal (optional!)
*** this fabric came from Joanns and it was already pieced together with the lace.  It was like $12 a yard but I used my 40%  coupon and only got 1/2 yard so it wasn't too bad!

1. Iron on  your vinyl decal (I cut mine out with my Silhouette and I got my flocked vinyl from Expressions Vinyl... they have AWESOME cheap prices!) 
2. Cut off the bottom of your shirt.  It is up to you where you want to cut it. I made sure I had enough room for my cupcake before I cut my shirt. 

3.To make the skirt.  Cut out a rectangle out of your fabric.  The length is up to you.  The Width should be 2X the circumference of the bottom of your shirt for make a good ruffle.  Finish the bottom edge of the skirt. I surged it, but you can also hem it or leave it to fray... up to you!  Use this super easy ruffle technique from MADE (I totally use the cheating way) to gather the top edge.

4. Sew the sides of the skirt together to make a tub and sew right-sides together to the bottom of your t-shirt

Optional: make a cute headband to match! 


Totally prefect for our play-park party! 
My daughter's favorite color is purple so we threw a purple party, complete with a purple party dress!


Linking to:


Content Ad